Authenticate HTTPs tunnels
Built-in HTTP Authentication
This page applies to inlets-pro 0.10.0 and onwards.
Services exposed over HTTP tunnels can have additional authentication added to them using a mechanism built-into inlets.
The inlets-pro http command provides three options:
- Basic Authentication
- Bearer Token Authentication
- OAuth
You may also be interested in IP filtering, which is configured on the server. This restricts access to a provided set of source IPs or CIDRs.
Basic Authentication
Basic authentication is a simple way to restrict access to your service by requiring a username and password.
When a user visits the URL of the service in a web-browser, they will be prompted to enter a username and password.
If they're using curl, then they can pass the username and password using the --user flag.
curl --user username:password https://example.com
Or simply pass the username and password as part of the URL:
curl https://username:password@example.com
The username has a default of admin for brevity, but can be overridden if you like:
inlets-pro http client \
    --basic-auth-username admin \
    --basic-auth-password password \
You can generate a string password using the openssl command:
openssl rand -base64 32
Bearer Token Authentication
If you're exposing an endpoint that does not need to be accessed via a web-browser, then you can use Bearer Token Authentication.
This is useful for exposing endpoints that are used by mobile apps or other non-web clients.
To enable Bearer Token Authentication, you can use the --bearer-token flag when starting the inlets-pro http command.
inlets-pro http client \
    --bearer-token token \
Both Bearer Token and Basic Authentication can be used together by supplying both flags.
inlets-pro http client \
    --bearer-token token \
    --basic-auth-username admin \
    --basic-auth-password password \
OAuth
With OAuth:
- You can define access for multiple users using usernames or email addresses
- Avoid managing credentials in your application
- Use an existing well-known provider for authentication such as GitHub
The OAuth 2.0 flow requires a web-browser, so if you anticipate mixed use, then you can combine it with Bearer Token Authentication, for headless clients.
The tunnel client currently has three reserved paths for OAuth:
- /_/oauth/login hosts the login page.
- /_/oauth/logout can be used to log out.
- /_/oauth/callback is used for the OAuth 2.0 callbacks.
Paths prefixed with /_/oauth can not be used by the tunneled service.
Example with GitHub.com
The example below will expose: http://127.0.0.1:3000 using the domain name tunnel.example.com.
In order to use GitHub as the OAuth provider, you need to create a new OAuth application.
- Go to GitHub Developer Settings
- Click on "New OAuth App"
- Enter a name for the application, for example
inlets-tunnel - Enter the callback URL, for example
http://tunnel.example.com/_/oauth/callback - Click on "Register application"
- Click "Generate a new client secret"
You will be given a client ID and client secret, which you can use to authenticate with GitHub.
We suggest saving this in a convenient location, for example: ~/.inlets/oauth-client-id and ~/.inlets/oauth-client-secret.
inlets-pro http client \
    --oauth-client-id $(cat ~/.inlets/oauth-client-id) \
    --oauth-client-secret $(cat ~/.inlets/oauth-client-secret) \
    --upstream tunnel.example.com=http://127.0.0.1:3000 \
    --oauth-provider github \
    --oauth-acl alexellis \
    --oauth-acl name@example.com
Access to the tunnel can be controlled using the --oauth-acl flag. Users can be filtered by username and email.
Tunnels using a commercial inlets license can also control access based on organisation membership. Providing the flag --oauth-acl=org:inlets would allow all users that are a member of the inlets GitHub organisation to access the tunnel.
Once authenticated, a cookie will be set on the domain i.e. tunnel.example.com and the user will be redirected back to the root URL of the service /.
The duration of the cookie defaults to 1 hour, but can be extended through the --oauth-cookie-ttl flag i.e.
inlets-pro http client \
+  --oauth-cookie-ttl 24h \
Example with Google
To use the Google provider you need a commercial Inlets license.
- Setup a new project in the Google API console
-
Configure the project OAuth consent screen.
Follow the steps to configure the OAuth consent screen.
If you are a Google Workspace user you can make your app available to any user within your organization by registering it as an internal app.
-
Create a new OAuth client
Create a new OAuth client with the application type
Web Application. Fill out the name and add the callback URL for your tunnel to the list of valid redirect URIs.Example of a redirect uri:
http://tunnel.example.com/_/oauth/callback. The callback for a tunnel is always available at/_/oauth/callback.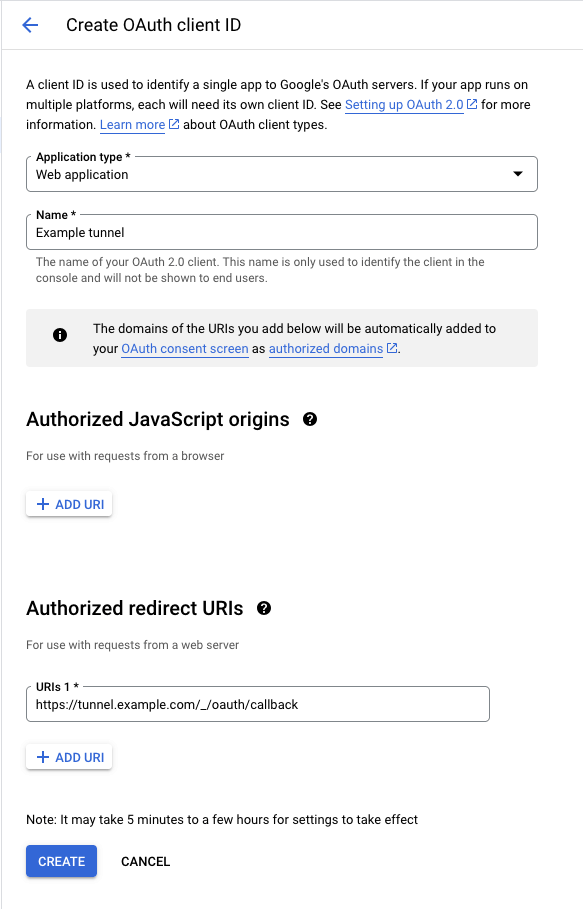
-
Save the Client ID and Client secret in a convenient place so they can be used when connecting the tunnel.
Connect the client:
inlets-pro http client \
    --upstream tunnel.example.com=http://127.0.0.1:3000 \
    --oauth-client-id $(cat ~/.inlets/oauth-client-id) \
    --oauth-client-secret $(cat ~/.inlets/oauth-client-secret) \
    --oauth-provider google \
    --oauth-acl example@gmail.com
You can control which users are allowed to access the tunnel by providing an email address using the --oauth-acl flag.
More providers will be added over time, based upon requests from users, so if you want to use Facebook, GitLab, etc, send us an email to help with prioritisation.