How to Expose Tunnels on the Internet
Info
Inlets Uplink is designed to connect customer services to a remote Kubernetes cluster for command and control as part of a SaaS product.
Any tunnelled service can be accessed directly from within the cluster using a ClusterIP Service and does not need to be exposed to the public Internet in order to be used by a SaaS product.
Each inlets uplink tunnel is provisioned with a ClusterIP service that you can access internally within the cluster. The same service can be used to expose the tunnel to the public Internet using an Ingress resource. This approach is recommended for new users for dozens of tunnels.
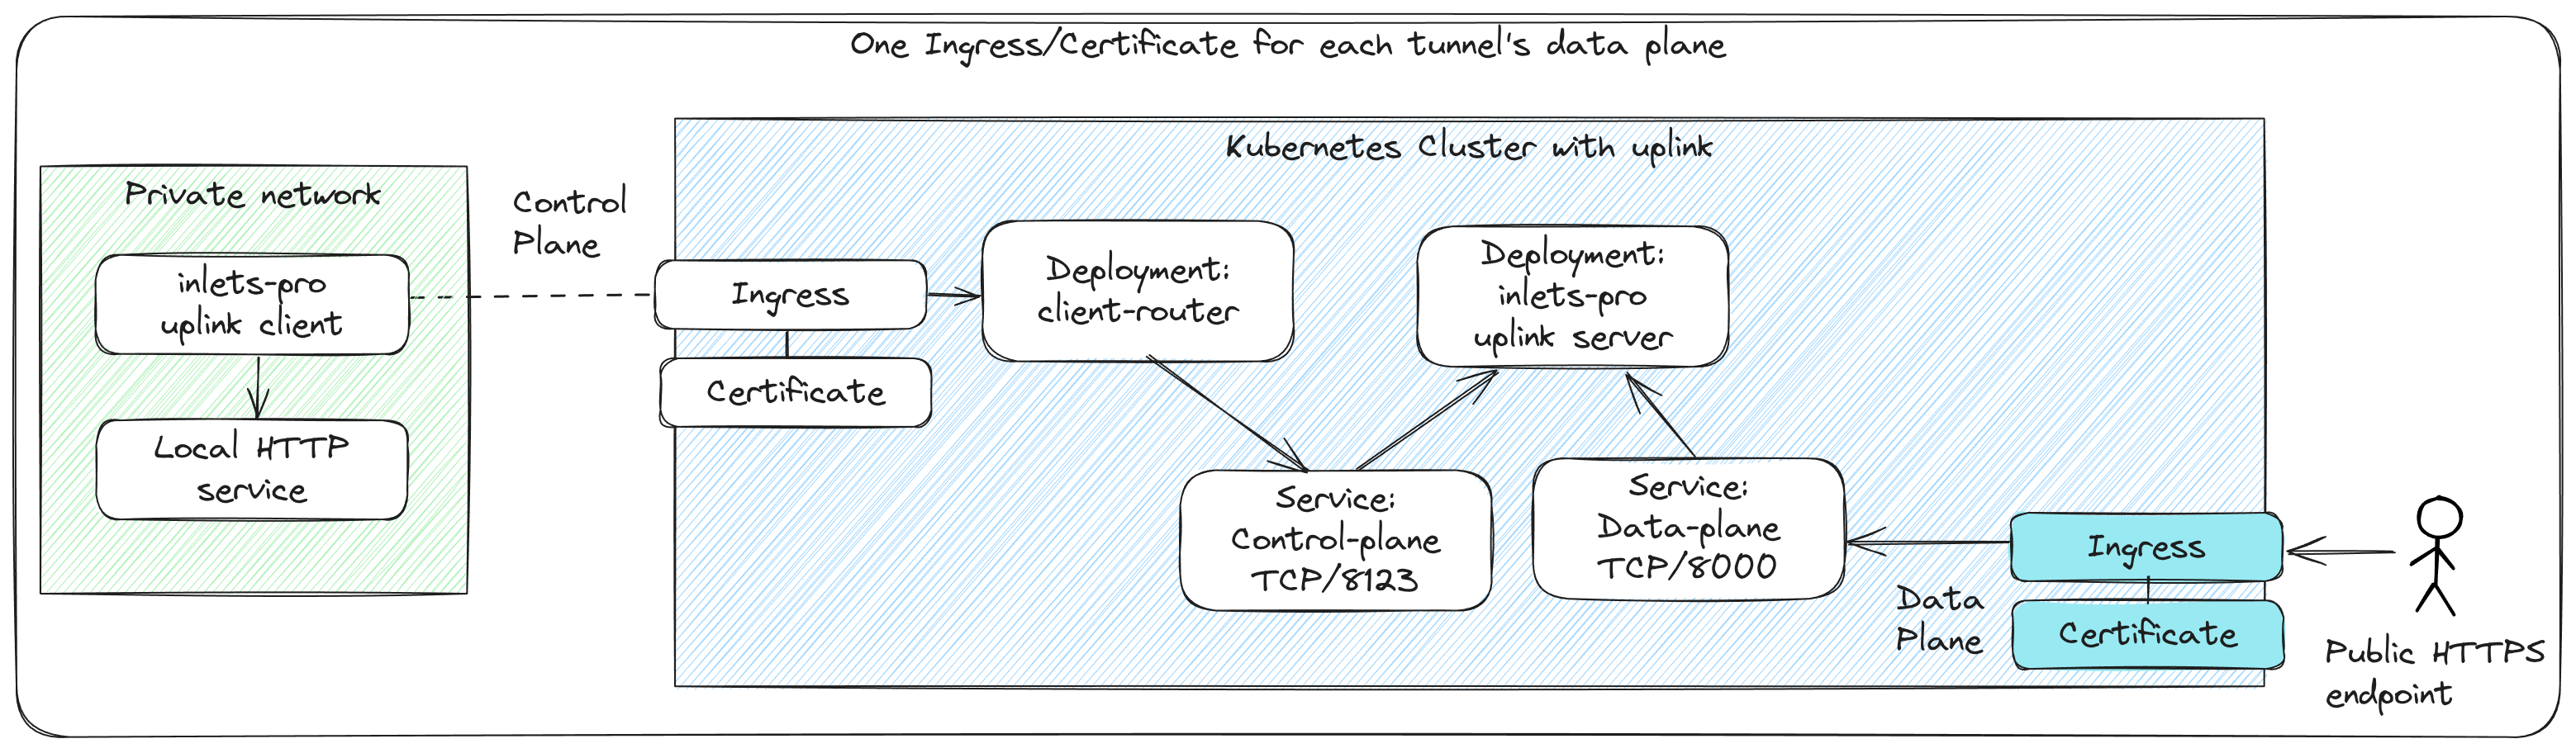
Each tunnel's data-plane is exposed via a separate Ingress and Certificate
Alternatively, the data-router component can be used along with a wild-card DNS record and TLS certificate to expose many tunnels with a single Ingress record or Istio Gateway. This approach requires additional setup because the DNS01 challenge requires a special cert-manager Issuer with a secret for the DNS provider's API. It is recommended for users with many tunnels, but is more complex to setup.

A single certificate and Ingress record can be used for multiple tunnels
Quick start
The instructions assume that you want to expose two HTTP tunnels. We will configure ingress for the first tunnel, called grafana, on the domain grafana.example.com. The second tunnel, called openfaas, will use the domain openfaas.example.com.
Both tunnels can be created with kubectl using the Custom Resource Definition, the inlets-pro CLI, or the REST API. See create tunnels for more info:
$ cat <<EOF | kubectl apply -f -
apiVersion: uplink.inlets.dev/v1alpha1
kind: Tunnel
metadata:
  name: grafana
  namespace: tunnels
spec:
  licenseRef:
    name: inlets-uplink-license
    namespace: tunnels
---
apiVersion: uplink.inlets.dev/v1alpha1
kind: Tunnel
metadata:
  name: openfaas
  namespace: tunnels
spec:
  licenseRef:
    name: inlets-uplink-license
    namespace: tunnels
EOF
$ inlets-pro tunnel create grafana
Created tunnel openfaas. OK.

$ inlets-pro tunnel create openfaas
Created tunnel openfaas. OK.
Follow the instruction for Kubernetes Ingress or Istio depending on how you deployed inlets uplink.
Expose the Tunnel with Ingress
-
Create a new certificate Issuer for tunnels:
cat > tunnel-issuer-prod.yaml <<EOF apiVersion: cert-manager.io/v1 kind: Issuer metadata: name: tunnels-letsencrypt-prod namespace: inlets spec: acme: server: https://acme-v02.api.letsencrypt.org/directory privateKeySecretRef: name: tunnels-letsencrypt-prod solvers: - http01: ingress: class: "traefik" EOF -
Create an ingress resource for the tunnel:
apiVersion: networking.k8s.io/v1
kind: Ingress
metadata:
  name: grafana-tunnel-ingress
  namespace: tunnels
  annotations:
    cert-manager.io/issuer: tunnels-letsencrypt-prod
spec:
  ingressClassName: traefik
  rules:
  - host: grafana.example.com
    http:
      paths:
      - path: /
        pathType: Prefix
        backend:
          service:
            name: grafana
            port:
              number: 8000
  tls:
  - hosts:
    - grafana.example.com
    secretName: grafana-cert
Note that the annotation
cert-manager.io/issueris used to reference the certificate issuer created in the first step.
To setup ingress for multiple tunnels simply define multiple ingress resources. For example, you could create a second ingress resource for the openfaas tunnel:
apiVersion: networking.k8s.io/v1
kind: Ingress
metadata:
  name: openfaas-tunnel-ingress
  namespace: tunnels
  annotations:
    cert-manager.io/issuer: tunnels-letsencrypt-prod
spec:
  ingressClassName: traefik
  rules:
  - host: openfaas.example.com
    http:
      paths:
      - path: /
        pathType: Prefix
        backend:
          service:
            name: openfaas
            port:
              number: 8000
  tls:
  - hosts:
    - openfaas.example.com
    secretName: openfaas-cert
Expose the Tunnel with an Istio Ingress Gateway
-
Create a new certificate Issuer for tunnels:
cat > tunnel-issuer-prod.yaml <<EOF
apiVersion: cert-manager.io/v1
kind: Issuer
metadata:
  name: tunnels-letsencrypt-prod
  namespace: istio-system
spec:
  acme:
    server: https://acme-v02.api.letsencrypt.org/directory
    privateKeySecretRef:
      name: tunnels-letsencrypt-prod
    solvers:
    - http01:
        ingress:
          class: "istio"
EOF
We are using the Let's Encrypt production server which has strict limits on the API. A staging server is also available at https://acme-staging-v02.api.letsencrypt.org/directory. If you are creating a lot of certificates while testing it would be better to use the staging server.
-
Create a new certificate resource. In this case we want to expose two tunnels on their own domain,
grafana.example.comandopenfaas.example.com. This will require two certificates, one for each domain:apiVersion: cert-manager.io/v1 kind: Certificate metadata: name: grafana-cert namespace: istio-system spec: secretName: grafana-cert commonName: grafana.example.com dnsNames: - grafana.example.com issuerRef: name: tunnels-letsencrypt-prod kind: Issuer --- apiVersion: cert-manager.io/v1 kind: Certificate metadata: name: openfaas-cert namespace: istio-system spec: secretName: openfaas-cert commonName: openfaas.example.com dnsNames: - openfaas.example.com issuerRef: name: tunnels-letsencrypt-prod kind: IssuerNote that both the certificates and issuer are created in the
istio-systemnamespace. -
Configure the Ingress Gateway for both tunnels. In this case we create a single resource for both hosts but you could also split the configuration into multiple Gateway resources.
apiVersion: networking.istio.io/v1
kind: Gateway
metadata:
  name: tunnel-gateway
  namespace: inlets
spec:
  selector:
      istio: ingressgateway # use Istio default gateway implementation
  servers:
  - port:
      number: 443
      name: https
      protocol: HTTPS
    tls:
      mode: SIMPLE
      credentialName: grafana-cert
    hosts:
    - grafana.example.com
  - port:
      number: 443
      name: https
      protocol: HTTPS
    tls:
      mode: SIMPLE
      credentialName: openfaas-cert
    hosts:
    - openfaas.example.com
Note that the
credentialsNamereferences the secrets for the certificates created in the previous step. -
Configure the gateway's traffic routes by defining corresponding virtual services:
apiVersion: networking.istio.io/v1
kind: VirtualService
metadata:
  name: grafana
  namespace: inlets
spec:
  hosts:
  - grafana.example.com
  gateways:
  - tunnel-gateway
  http:
  - match:
    - uri:
        prefix: /
    route:
    - destination:
        host: grafana.tunnels.svc.cluster.local
        port:
          number: 8000
---
apiVersion: networking.istio.io/v1
kind: VirtualService
metadata:
  name: openfaas
  namespace: inlets
spec:
  hosts:
  - openfaas.example.com
  gateways:
  - tunnel-gateway
  http:
  - match:
    - uri:
        prefix: /
    route:
    - destination:
        host: openfaas.tunnels.svc.cluster.local
        port:
          number: 8000
After applying these resources you should be able to access the data plane for both tunnels on their custom domain.
Wildcard Ingress with the data-router
As an alternative to creating individual sets of Ingress records, DNS A/CNAME entries and TLS certificates for each tunnel, you can use the data-router to route traffic to the correct tunnel based on the hostname. This approach uses a wildcard DNS entry and a single TLS certificate for all tunnels.
To enable the data-router, you will need to modify the values.yaml file you created during the initial installation of the Inlets Uplink Helm chart.
The following example is adapted from the cert-manager documentation to use DigitalOcean's DNS servers, however you can find instructions for issuers such as AWS Route53, Cloudflare, Google Cloud DNS, and AzureDNS being listed.
DNS01 challenges require a secret to be created containing the credentials for the DNS provider. The secret is referenced by the issuer resource.
kubectl create secret generic \
  -n inlets digitalocean-dns \
  --from-file access-token=$HOME/do-access-token
Create a separate Issuer, assuming a domain of uplink.example.com, where each tunnel would be i.e. prometheus.uplink.example.com or api.uplink.example.com:
export NS="inlets"
export ISSUER_NAME="inlets-wildcard"
export DOMAIN="uplink.example.com"

cat <<EOF | kubectl apply -f -
apiVersion: cert-manager.io/v1
kind: Issuer
metadata:
  name: $ISSUER_NAME
  namespace: $NS
spec:
  acme:
    server: https://acme-v02.api.letsencrypt.org/directory
    privateKeySecretRef:
      name: $ISSUER_NAME
    solvers:
    - dns01:
        digitalocean:
            tokenSecretRef:
              name: digitalocean-dns
              key: access-token
EOF
Update values.yaml to enable the dataRouter and to specify the wildcard domain:
## The dataRouter is an option component to enable easy Ingress to connected tunnels.
## Learn more under "Ingress for Tunnels" in the docs: https://docs.inlets.dev/
dataRouter:
  enabled: true

  # Leave out the asterix i.e. *.uplink.example.com would be: uplink.example.com
  wildcardDomain: "uplink.example.com"

  tls:
    issuerName: "inlets-wildcard"

    ingress:
      enabled: true
Optional: rate limiting for the data-router
Traefik Middleware can be used to apply rate limiting on the data-router Ingress. See Traefik rate limiting for details on creating Middleware resources.
To reference the middleware, add the annotation to your values.yaml:
dataRouter:
  tls:
    ingress:
      annotations:
        traefik.ingress.kubernetes.io/router.middlewares: inlets-data-router-ratelimit@kubernetescrd,inlets-data-router-inflight-limit@kubernetescrd
Apply the updated values:
helm upgrade --install inlets-uplink \
  oci://ghcr.io/openfaasltd/inlets-uplink-provider \
  --namespace inlets \
  --values ./values.yaml
You can now create a new tunnel or modify an existing one and specify the hostname you want to use under the ingressDomains field. This field is an array and can take more than one hostname, depending on how many services you want to expose via the tunnel.
export TUNNEL_NS="tunnels"
export DOMAIN="uplink.example.com"

cat <<EOF | kubectl apply -f -
apiVersion: uplink.inlets.dev/v1alpha1
kind: Tunnel
metadata:
  name: fileshare
  namespace: $TUNNEL_NS
spec:
  licenseRef:
    name: inlets-uplink-license
    namespace: $TUNNEL_NS
  ingressDomains:
    - fileshare.$DOMAIN
EOF
On a private computer, create a new directory, a file to serve and then run the built-in HTTP server:
cd /tmp
mkdir -p ./share
cd ./share
echo "Hello from inlets" > index.html

inlets-pro fileserver --port 8080 --allow-browsing --webroot ./
Get the instructions to connect to the tunnel.
The --domain flag here is for your uplink control-plane, where tunnels connect, not the data-plane where ingress is served. This is usually i.e. uplink.example.com.
export TUNNEL_NS="tunnels"
export UPLINK_DOMAIN="uplink.example.com"

inlets-pro tunnel connect fileshare \
  --namespace $TUNNEL_NS \
  --domain $UPLINK_DOMAIN
Add the --upstream fileshare.uplink.example.com=fileshare flag to the command you were given, then run it.
The command below is sample output, do not copy it directly.
inlets-pro uplink client \
  --url=wss://uplink.example.com/tunnels/fileshare \
  --token=REDACTED \
  --upstream fileshare.uplink.example.com=http://127.0.0.1:8080
Now, access the tunneled service via the wildcard domain i.e. https://fileshare.uplink.example.com.
You should see: "Hello from inlets" printed in your browser.
Finally, you can view the logs of the data-router, to see it resolving internal tunnel service names for various hostnames:
kubectl logs -n inlets deploy/data-router

2024-01-24T11:29:16.965Z        info    data-router/main.go:51  Inlets (tm) Uplink - data-router:

2024-01-24T11:29:16.970Z        info    data-router/main.go:90  Listening on: 8080      Tunnel namespace: (all) Kubernetes version: v1.27.4+k3s1

I0124 11:29:58.858772       1 main.go:151] Host: fileshares.uplink.example.com    Path: /
I0124 11:29:58.858877       1 roundtripper.go:48] "No ingress found" hostname="fileshares.uplink.example.com" path="/"

I0124 11:30:03.588993       1 main.go:151] Host: fileshare.uplink.example.com     Path: /
I0124 11:30:03.589051       1 roundtripper.go:56] "Resolved" hostname="fileshare.uplink.example.com" path="/" tunnel="fileshare.tunnels:8000"