Tutorial: Expose a local Kubernetes API Server
In this tutorial, we'll show you how to expose a local Kubernetes API Server on the Internet, so that you can access it from anywhere, just like with a managed cloud provider.
Pre-reqs
- A computer or laptop running MacOS or Linux, or Git Bash or WSL on Windows
- Docker for Mac / Docker Daemon - installed in the normal way, you probably have this already
- Kubernetes running locally with kubeadm, K3s, K3d, Minikube, KinD, Docker Desktop, etc
The Kubernetes cluster
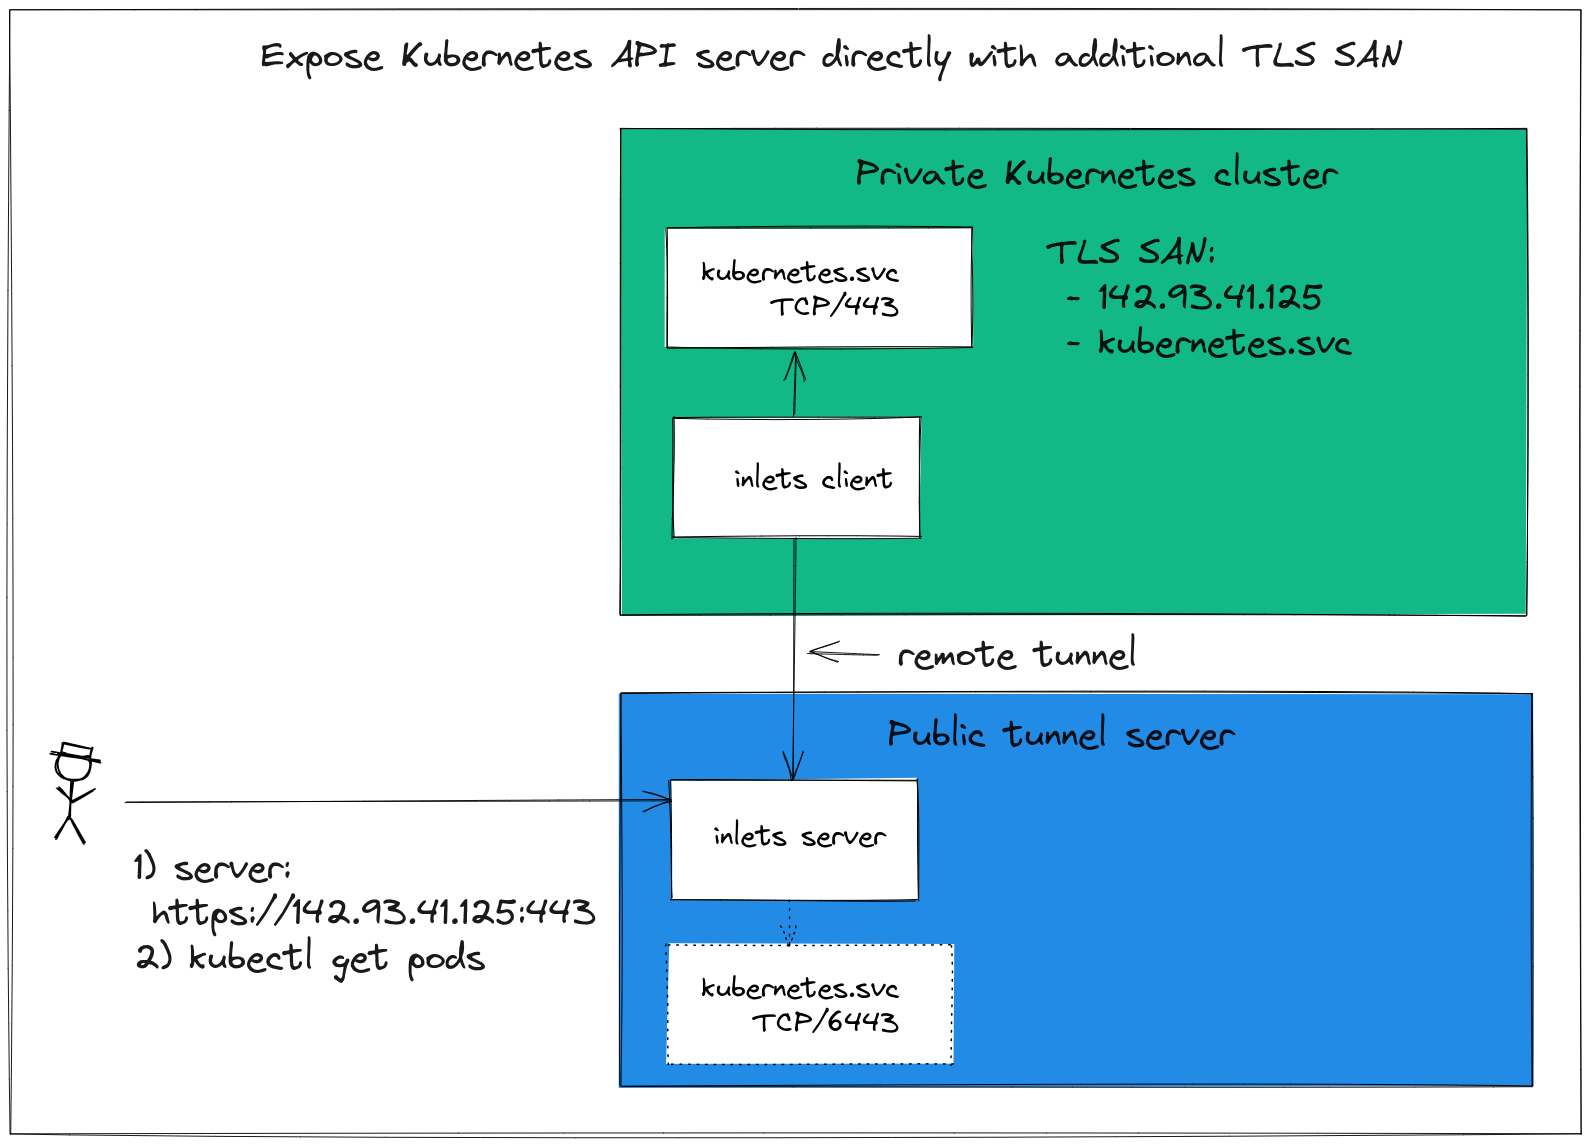
By default every Kubernetes cluster has TLS enabled to encrypt any HTTP REST messages that go over its control-plane. The TLS certificate has to be bound to a certain name, sometimes called a TLS SAN.
The certificate is usually only valid for "kubernetes.default.svc", and can only be accessed from within the cluster.
Kubernetes on tour - get access to your cluster from anywhere, without having to resort to complex tooling like VPNs.
When a managed cloud provider provisions you a cluster, they'll add additional names into the certificate like "customer1.lke.eu.linode.com" which is then added to your generated kubeconfig file that you download in the dashboard.
We have five steps run through to expose the API server:
- Create a Kubernetes cluster
- Create a VM on the public cloud with an inlets TCP server running onit
- Create a DNS entry for the public VM's IP address
- Configure a TLS SAN, if possible with a new domain name
- Set up an inlets client as a Pod to forward traffic to the Kubernetes API Server
Once we have all this in place, we can take our existing kubeconfig file and edit the URL, so that instead of pointing at our LAN IP or localhost, it points to the domain mapped to the public VM.
Create a cluster
You can create a cluster on any machine by using KinD:
arkade get kind
kind create cluster
If you have a Raspberry Pi or a Linux Server, you can install K3s using k3sup:
arkade get k3sup

k3sup install --ip 192.168.1.101 --user pi
In either case, you'll get back a kubeconfig file.
Here's a snippet of what I got back from running k3sup install:
apiVersion: v1
clusters:
- cluster:
    server: https://192.168.1.101:6443
The server field will need to be changed to the new public address later on.
Create a VM on the public cloud with an inlets TCP server running on it
Just like when Linode Kubernetes Engine provisions us a domain like "customer1.lke.eu.linode.com", we'll need our own subdomain too, so that the certificate can be issued for it.
In order to create the DNS record, we a public IP which we will get by creating a tunnel server on our preferred cloud and in a region that's close to us.
arkade get inletsctl

export ACCESS_TOKEN="" # Retreive this from your cloud dashboard

inletsctl create \
  --provider linode \
  --tcp \
  --access-token $ACCESS_TOKEN \
  --region eu-west
Save the connection info from inletsctl into a text file for later.
# Give a single value or comma-separated
export PORTS="8000"

# Where to route traffic from the inlets server
export UPSTREAM="localhost"

inlets-pro tcp client --url "wss://139.160.201.143:8123" \
  --token "f2cXtOouRpuVbAn4arVvdSMx//uKD3jDnssr3X9P338" \
  --upstream $UPSTREAM \
  --ports $PORTS
Create a DNS subdomain for the IP address you were given:
k3s.example.com=>139.160.201.143
Check that you can resolve the IP with a ping ping -c 1 k3s.example.com
Now check the status of the inlets server:
export TOKEN="f2cXtOouRpuVbAn4arVvdSMx//uKD3jDnssr3X9P338"

inlets-pro status --url "wss://139.160.201.143:8123" \
  --token "$TOKEN"
Output:
inlets server status. Version: 0.9.3 - 8e96997499ae53c6fb2ae9f9e13fa9b48dcb6514

Server info:
Hostname:       localhost
Process uptime: 5 seconds ago
Mode:           tcp
Version:        0.9.3 8e96997499ae53c6fb2ae9f9e13fa9b48dcb6514

No clients connected.
We can now move onto the next step.
Configure a TLS SAN, if possible with a new domain name
With k3s, it's trivial to add additional TLS SAN names for the Kubernetes API Server.
If you run the k3sup install command again, it'll update your configuration:
k3sup install \
  --ip 192.168.1.101 \
  --user pi \
  --tls-san k3s.example.com
You'll now have the custom domain along with the default kubernetes.default.svc as valid names in the generated certificate.
If you're not running on k3s, or use a service where you cannot change the TLS SAN, then we'll show you what to do in the next step.
Update your kubeconfig file with the new endpoint
We need to update our kubeconfig file to point at the custom domain instead of at whatever loopback or LAN address it currently does.
For K3s users, change the server URL:
apiVersion: v1
clusters:
- cluster:
    server: https://192.168.1.101:6443
To:
apiVersion: v1
clusters:
- cluster:
    server: https://k3s.example.com:443
For any user where you cannot regenerate the TLS certificate for the API Server, you can specify the server name in the config file:
apiVersion: v1
clusters:
- cluster:
    server: https://k3s.example.com:443
    tls-server-name: kubernetes
For more details see: Support TLS Server Name overrides in kubeconfig file #88769
Save the changes to your kubeconfig file.
Connect the tunnel
The tunnel acts like a router, it takes any TCP packets sent to port 6443 (k3s) or 443 (Kubernetes) and forwards them down the tunnel to the inlets client. The inlets client then looks at its own "--upstream" value to decide where to finally send the data.
Save inlets-k8s-api.yaml:
export LICENSE="$(cat $HOME/.inlets/LICENSE)"
export TOKEN="f2cXtOouRpuVbAn4arVvdSMx//uKD3jDnssr3X9P338" # populate with the token from inletsctl
export SERVER_IP="139.160.201.143" # populate with the server IP, not the domain

cat > inlets-k8s-api.yaml <<EOF
---
apiVersion: apps/v1
kind: Deployment
metadata:
  name: inlets-client
spec:
  replicas: 1
  selector:
    matchLabels:
      app: inlets-client
  template:
    metadata:
      labels:
        app: inlets-client
    spec:
      containers:
      - name: inlets-client
        image: ghcr.io/inlets/inlets-pro:0.9.9
        imagePullPolicy: IfNotPresent
        command: ["inlets-pro"]
        args:
        - "tcp"
        - "client"
        - "--url=wss://$SERVER_IP:8123"
        - "--upstream=kubernetes.default.svc"
        - "--port=443"
        - "--port=6443"
        - "--token=$TOKEN"
        - "--license=$LICENSE"
---
EOF
You'll see the tunnel client up and running and ready to receive requests:
kubectl logs deploy/inlets-client
2022/06/24 09:51:18 Licensed to: Alex <contact@openfaas.com>, expires: 128 day(s)
2022/06/24 09:51:18 Upstream server: kubernetes.default.svc, for ports: 443, 6443
time="2022/06/24 09:51:18" level=info msg="Connecting to proxy" url="wss://139.160.201.143:8123/connect"
inlets-pro TCP client. Copyright OpenFaaS Ltd 2021
time="2022/06/24 09:51:18" level=info msg="Connection established" client_id=5309466072564c1c90ce0a0bcaa22b74
Check the tunnel server's status to confirm the connection:
export TOKEN="f2cXtOouRpuVbAn4arVvdSMx//uKD3jDnssr3X9P338"

inlets-pro status --url "wss://139.160.201.143:8123" \
  --token "$TOKEN"

inlets server status. Version: 0.9.3 - 8e96997499ae53c6fb2ae9f9e13fa9b48dcb6514

Server info:
Hostname:       localhost
Process uptime: 15 minutes ago
Mode:           tcp
Version:        0.9.3 8e96997499ae53c6fb2ae9f9e13fa9b48dcb6514

Connected clients:
Client ID                        Remote Address        Connected  Upstreams
5309466072564c1c90ce0a0bcaa22b74 192.168.1.101:16368 43 seconds kubernetes.default.svc:443, kubernetes.default.svc:6443
Finally prove that it's working with the new, public address:
$ kubectl cluster-info
Kubernetes control plane is running at https://k3s.example.com:443
CoreDNS is running at https://k3s.example.com:443/api/v1/namespaces/kube-system/services/kube-dns:dns/proxy
Metrics-server is running at https://k3s.example.com:443/api/v1/namespaces/kube-system/services/https:metrics-server:https/proxy

To further debug and diagnose cluster problems, use 'kubectl cluster-info dump'.
Wrapping up
In a relatively short period of time, with a custom domain, and a small VM, we set up a tunnel server to route traffic from the public Internet to a K3s server on an internal network.
This gives you a similar experience to a managed public cloud Kubernetes engine, but running on your own infrastructure, or perhaps within a restrictive VPC.
You may also like:
- Learn how to manage apps across multiple Kubernetes clusters by Johan Siebens
If you'd like to talk to us about this tutorial, feel free to reach out for a meeting: